Guess what? We're sick again. That means I got some blog posts up! Also, some projects just finally got finished, so yeah, that makes a difference too.
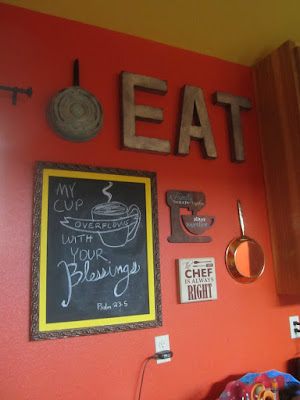
For some reason, I love to eat. It's a hobby of mine; I enjoy most aspects of consuming food. So years back when I saw the word "EAT" hung in a kitchen, I thought, "Perfect! Exactly what I need in my kitchen!" So I had a smaller version in our other house, but now in our new place, I wanted it to be a bigger statement. Since we have rusted metal on our living room ceiling, I thought it would be perfect to have rusted metal letters spelling the word.
As much as I didn't want to incur another project, I couldn't bring myself to pay the overinflated price for real rusted metal letters at the store. I was able to buy all three letters in cardboard for the price of one of the metal letters. So, I had to come up with a way to make the letters look rusty. I searched Pinterest and combined a couple of different methods, as well as wingin' it myself a little. They turned out amazing, and I actually like mine better than the real metal ones from the store!
I started out by spray painting the letters in a silver/chrome metallic paint. This looks pretty cool on it's own, but I really wanted a more aged look.
The next step is to sand the finish a little. Use a fine grit sand paper, and make sure to hit all the edges and corners. I also buffed a few spots here and there to give it a little more age. You shouldn't actually take the paint off all the way, it just gets darker in the places you sand.
Next we're going to stain it a little. I took dark brown paint and watered it down a little. Brush on, wipe off. This isn't going to make it look rusty, but it will help it look a little dingier, and not quite so new.
This picture makes it look a little more like the original cardboard, but it looks cool in real life.
The next step takes a little more artistic ability out of you, which was scary to me since I am in no way an artist, but it's not too hard to figure out. I mixed a little red paint into my dark brown (making a rust color) and brushed the paint on around the corners and edges. Brush from the edge in to make a feathered effect. Go thicker in some places, thinner in others, but you need to hit all the edges and corners.
It takes a little more time than the other steps, but it's definitely what makes it look authentic. I was staring at it so long that I couldn't tell if it looked good at all. So you might choose to take breaks between each letter.
Bam! Authentic looking rusted metal letters! Sabrina approves.
It took a while before it finally got up on the wall, but it looks great there now!
Looks great with all my other decorative items.
So now I have my favorite thing to do hanging in my kitchen again. Feels like home.


love it! good job executing your vision!!
ReplyDelete